A Mandala Created Through Filters.
HERE IT IS: We will begin with a picture with strong colors. Lets do the same one as practice.
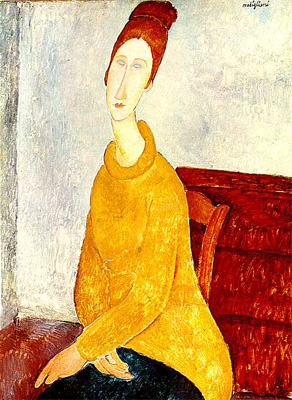
Copy the Modigliani below (a famous artist.)
 |
2. Select Menu -> select "ALL"
3. Edit Menu -> select "COPY"
4. File Menu -> select "NEW"
In the new dialogue box your file size already says 292 pixels wide, 400 pixels high and 72 pixels/inch.
4A. Type in a title: "makingthefour"
4B. Increase the size of the image by setting the width to 2x292 = 584 pixels and height 2x400 = 800 pixels
5. Edit Menu -> select "PASTE"
Now you will have the original Modigliani image smack in the middle of your 584 x 800 pixel white window.
6. Click on the MOVE TOOL (v) and move the image to the upper left corner. If need be, play with the up-down,
left-right arrows on your keyboard to ensure that your image is flush against the upper left corner.
(Go to View>Snap to snap it in the corner)
7.Again go to Edit Menu -> select "PASTE"
Now you will have one Modigliani image at the upper left and a new one in the middle of the window.
8. Click on the MOVE TOOL and move the image to the upper right corner.
Play with the up-down, left-right keyboard arrows until the two images are flush to each other.
Now do you see why you doubled the width and height of the original?
9. Ctrl+T -> select "FLIP HORIZONTAL"
10. Edit Menu -> select "PASTE" [which should give you a third modigliani image in the middle with the other two in the upper left and right corners.
11. Click on the MOVE TOOL and move the image to the lower left corner.
12. Ctrl+T -> select "FLIP VERTICAL"
13. Edit Menu -> select "PASTE" [which should give you a fouth modigliani image
in the middle with the other three in the corners.
14. Click on the MOVE TOOL and move the image to the lower right corner.
15.Ctrl + T and "FLIP VERTICAL"
16. Ctrl + T and "FLIP HORIZONTAL"
In the next step you will flatten the image into one layer.
Now we will apply filters:
1. Filter Menu -> select "DISTORT" -> select "PINCH"
2. You will see a dialogue box that gives you some options.
You can click on the "+" and "-" so that you have a whole image in the small dialogue box window.
And you can select the amount of pinching, from -100% to +100%. Note that I've selected +100%. Click "OK".
3. Filter Menu -> select "DISTORT" -> select "TWIRL":
Now you will get the Twirl dialogue box which will allow you to adjust the amount of twirl on the image. Click "OK".

4. Click on the "rectangular marquee tool" (m) in the upper left of your tool box.
I chose a section in the lower right corner. The size is unimportant.
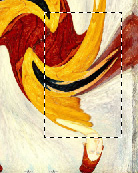
5. Spread it on part of your pinched/twirled image so that it looks something
like the area I've selected as shown in the image above.
6. Edit Menu -> select "COPY"
This means that you have the selected part of the image in your clipboard.
7. File Menu -> select "NEW" and continue on to "Make the Four" but with this new image.
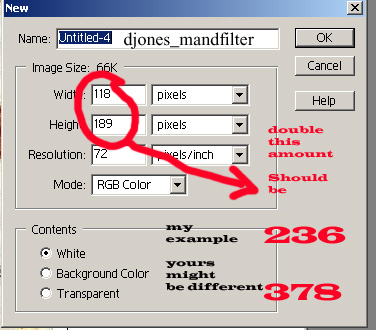
Important Function Step #8
8. Name this image as seen on the screen shot below...
(by the way...your name IS NOT djones)
This will be your file for saving.
You will need to double the width and height.
Remember, everyone's file size will be different.
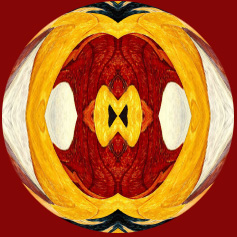
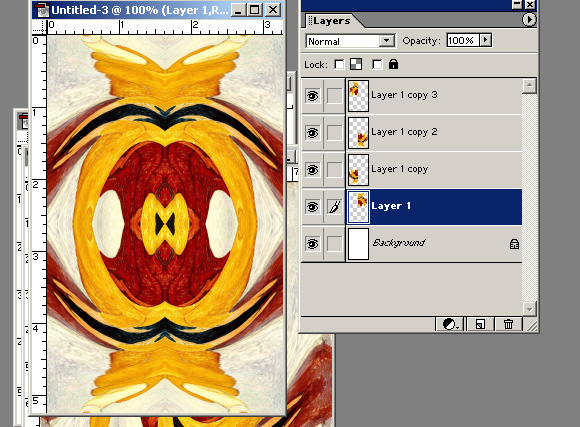
9. If you've forgotten how to make the four, go back to step 1. .
10. After making the four, my file looks like this: notice that the layers need merging.
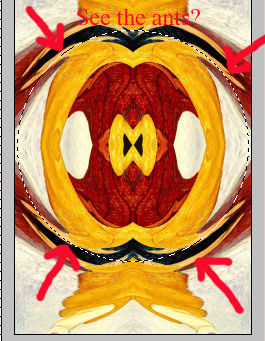
11. Now I will select a circle around this using my elliptical marquee tool.
Hold down the rectangle marquee (m) to access the "ellipse" icon in your tools palette.
Place your curser in the center. While holding down the "Alt" key together with the Shift key
and begin dragging a circle. If you also hold down the Space Bar while you're
dragging you can also reposition the curser. I know, I know that's a lot of fingers, dude!
Drag it until you touch the sides of your canvas. See my screen shot example.
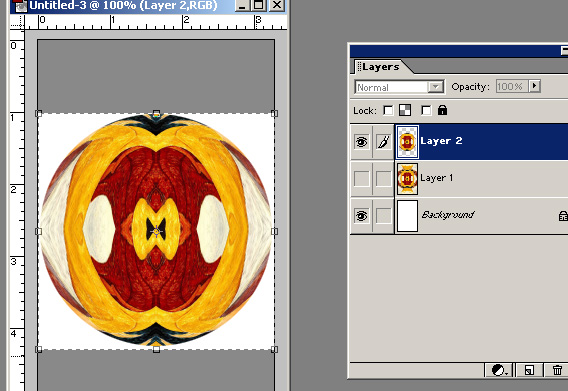
12. Last couple steps to finish:
While you have a circular set of "ants", use Ctrl + J command. This copies it and puts it on
its own layer. Then using the Crop tool (C), hold down the shift key,
and drag from left side to right side. This will ensure a perfect square.
See the screen shot below. Hit enter to apply the crop.
Now add a nice background color and flatten image.
Don't send this to me.
My Final